Connect a printer to the UBER EATS tablet in WiFi
The Uber Eats Wifi printer is available on our store.
This printer is only usable for the Uber Eats delivery platform, if you want to use a single printer for several platforms (Deliveroo, Just Eat, WooCommerce…), the Multi Platform model is more suitable.
Operation with Uber Eats tablet
Using your official Uber Eats tablet (not included), the printer will receive print orders with each new order.
No need for a USB cable between the printer and the tablet!
You can even choose to have your orders printed automatically as soon as they are received to save even more time on preparation.
Warning: Do not connect other devices to the same Uber Eats printer.
It is recommended to dedicate only one printer per application.
How it works with the Uber Eats for Restaurant app
You can use the official Uber Eats tablet or an Apple iOS/Android device.
Use the Uber Eats restaurant app.
The tablet must be connected to the same WiFi network as the printer.
Configure WIFI access
Wifi networks only supported : 2.4Ghz
Wifi networks not supported : 5Ghz
Connect the Uber Eats printer to WiFi with a Windows computer.
- Download PrinterSetting software at the following address https://www.printer-point.com/docs/printersetting_printerpoint_software.zip
- Connect the printer to your computer via USB.
Plug it into the mains, then turn it on with the button on the front of the machine. - Unzip and launch the Printer Setting application
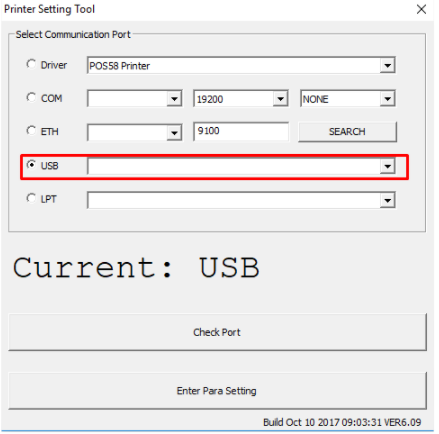
- You will see this screen:

Choose USB, the name of your printer must appear in the drop-down menu.
The name can appear like this:
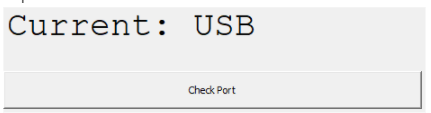
- Click on CHECK PORT

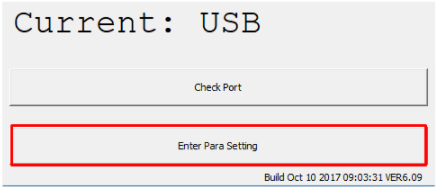
A paper will come out to indicate that the computer is connected to this printer. - Click ENTER PARA SETTING to configure the WIFI settings.

- Click on the WIFI tab at the top.

- Put the name of your internet box in the WIFI SSID box
- Click on the WPA button to select the security mode. The dot should appear in the small circle to the left of WPA.

- And your WiFi access password in the KEY box

- To save, press SET.

- A ticket will come out with the name of the box and the password. This shows that the identifiers are registered on your printer.

Linking the printer to the Uber Eats tablet
- Open Uber Eats app
- Click on SETTINGS
- Tap on the slider to enable “Receipt printing”
- Select printer (TSPxxx)
It can take up to 30 seconds to detect a printer - Click on TEST PRINT
- A TEST ticket is printed.
Make sure your tablet has the latest update for the Uber Eats app before pairing the printer