-
CMS Plugins
-
API | Developers
-
- Prochainement
-
Printers and Accessories
-
- GPRS connection settings SIM Card 2G 3G 4G
- Image and logo printing
- Internet connection
- Internet connection with a Ethernet cable (LAN RJ45)
- Mention "Printed using Expedy.io".
- Print PDF
- QR Code / Barcode
- QuickStart Cloud Printer 58mm
- QuickStart Installation Cloud Printer 80mm
- Send a test print request
- Tags Settings
- Text layout | Building a receipt ticket
- WiFi Setup
-
- Cloud Print Box: Ethernet cable and WiFi connection
- Connecting an ESC POS ticket printer to the Cloud Print Box adapter
- Image and logo printing
- Installing the Cloud Print USB Adapter
- Mention "Printed using Expedy.io".
- Print PDF
- QR Code / Barcode
- Send a test print request
- Tags Settings
- Text layout | Building a receipt ticket
-
General Terms
-
Expedy TMS
- Prochainement
-
Expedy M2M SIM Card
-
Raspberry Pi
-
Uber Eats printer
-
DoorDash Printer
-
Restaurant delivery platforms
Installing the Cloud Print USB Adapter
The Expedy Cloud Print Box is an adapter connecting to the printer via its USB interface, in order to transform the latter into a printer connected to a print server.
Compatible with ESC/POS thermal printer via USB (Epson, Star, Toshiba, etc.)
Compatible with thermal label printer via USB (Datamax Oneil, Zebra, etc.)
Compatible with photo printer (DPN, etc.)
Internet connection:
- Network cable (Ethernet RJ45 LAN)
- WiFi 2.4/5Ghz
- GPRS Sim card (4G USB key option: Huawei E3372 model)
Getting started
- If you haven’t already done so, make sure before you activate your product via this link
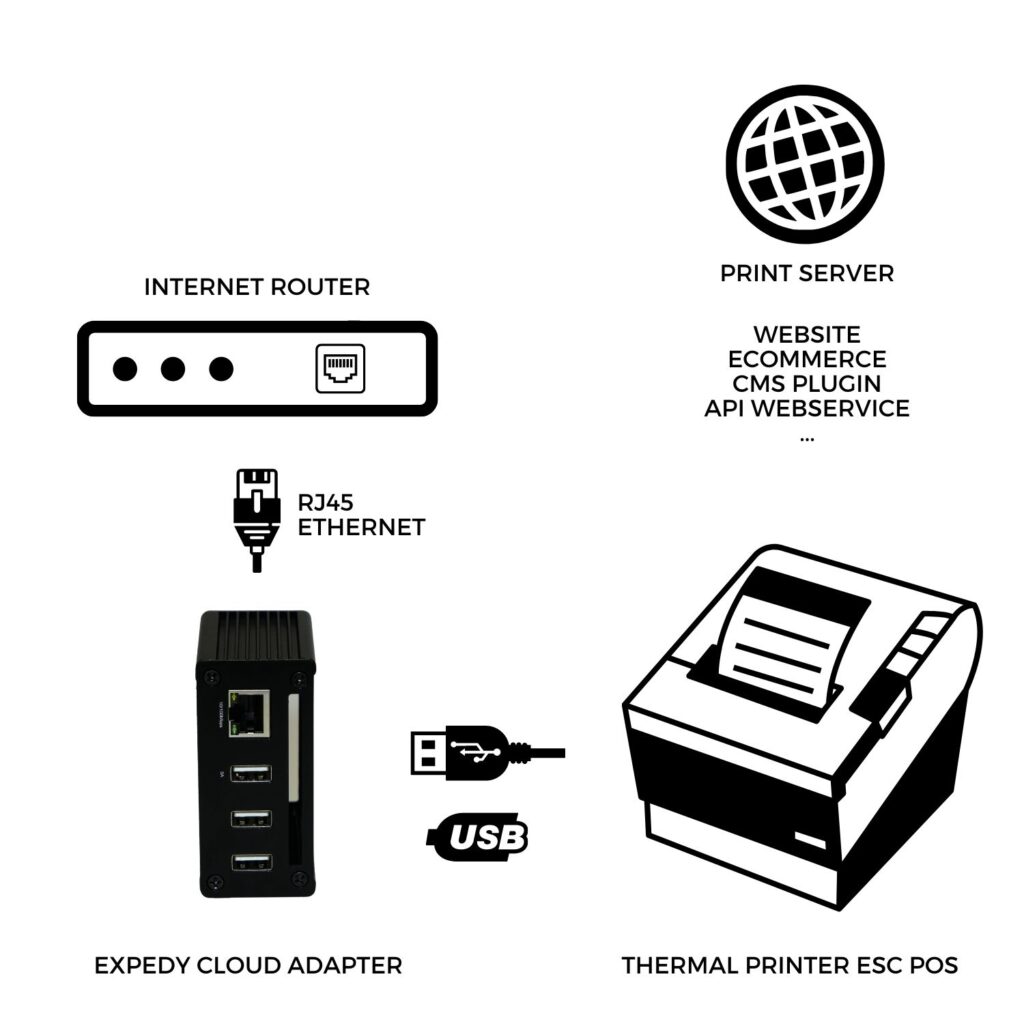
- Connect the Expedy adapter to the Internet router using an RJ45 (LAN) cable.
- Connect the printer to the USB1 port (see diagram below)
- Switch on the printer
- Switch on the Expedy Print adapter
- Go to the customer area Expedy > Machines > Settings > Ping
Updating the date and time of the last ping confirms the internet connection to the EXPEDY server.
WiFi
USB ports
WARNING: If you are using API V1 or an eCommerce plugin (Woocommerce, Prestashop, Shopify…), the printer must be connected to the USB1 port.
ECPBMINI and ECPBMINIG models

Model ECPB1

Example of installation with a ticket printer

Installation help video
Français (French)
English
Español (Spanish)
Deutsch (German)
Italiano (Italian)
Português (Portuguese (Portugal))