


Documentation
-
CMS Plugins
-
API | Developers
-
- Prochainement
-
Printers and Accessories
-
- GPRS connection settings SIM Card 2G 3G 4G
- Image and logo printing
- Internet connection
- Internet connection with a Ethernet cable (LAN RJ45)
- Mention "Printed using Expedy.io".
- Print PDF
- QR Code / Barcode
- QuickStart Cloud Printer 58mm
- QuickStart Installation Cloud Printer 80mm
- Send a test print request
- Tags Settings
- Text layout | Building a receipt ticket
- WiFi Setup
-
- Cloud Print Box: Ethernet cable and WiFi connection
- Connecting an ESC POS ticket printer to the Cloud Print Box adapter
- Image and logo printing
- Installing the Cloud Print USB Adapter
- Mention "Printed using Expedy.io".
- Print PDF
- QR Code / Barcode
- Send a test print request
- Tags Settings
- Text layout | Building a receipt ticket
-
General Terms
-
Expedy TMS
- Prochainement
-
Expedy M2M SIM Card
-
Raspberry Pi
-
Uber Eats printer
-
DoorDash Printer
-
Restaurant delivery platforms
Send a test print request
You can send a print request manually via the console or via the API sandbox, for example to check that the machine is properly connected to the Internet.
This test is compatible with Expedy cloud printers (Woo, Prestashop, Shopify, API…) and the USB Ethernet adapter.
Via Expedy console
- Log in to the console: https: //www.expedy.fr/console/(open a ticket if you haven’t received your login details)
- Go to PRINTERS

- Selecting your printer
- Go to PRINT JOBS HISTORY
- You can write a new message or copy and paste the last message received from the history (last 10 requests).
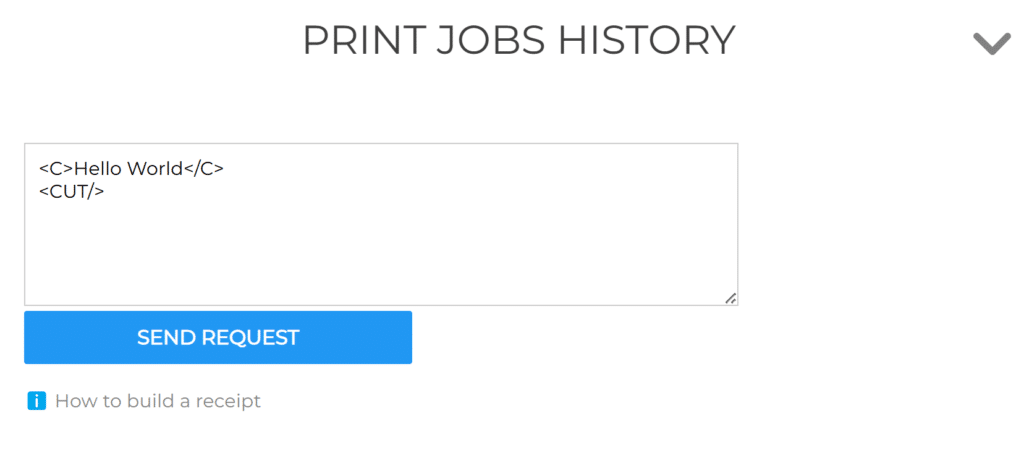
- Click on SEND REQUEST, and the message will be printed in less than 2 seconds.
If the manually-written message doesn’t print, check the device’s Internet connection (network cable, 4G SIM card).
![]() Français (French)
Français (French) ![]() English
English ![]() Español (Spanish)
Español (Spanish) ![]() Deutsch (German)
Deutsch (German) ![]() Italiano (Italian)
Italiano (Italian) ![]() Português (Portuguese (Portugal))
Português (Portuguese (Portugal))