Documentation
Cloud Print Box: Ethernet cable and WiFi connection
Turn your printer into a remote print server with ECPBMINI!
Ports 1883 and 8883 must be open on your network.
Connect Expedy Cloud Print Box with Ethernet cable
- Connect an Ethernet network cable between the Expedy Cloud Print Box and your Internet router.
- Connect a USB cable between the Expedy Cloud Print Box and your printer
Here’s an example of a USB Type B port often found on the back of a printer:
Important! Preferably use the cable supplied by the printer manufacturer. - Switch the printer ON, then connect the power cable to an electrical outlet to switch on the Expedy box.
- Expedy Cloud Print Box is initializing
- Connect to the Expedy console
- Go to MACHINES
- Click on the machine to be configured
- The machine should appear with “Last PING” and the current date.

- You can check printer detection by clicking on USB SCAN
Select ESC POS for a receipt printer, the paper width 80 or 58mm, and finally the graphics mode.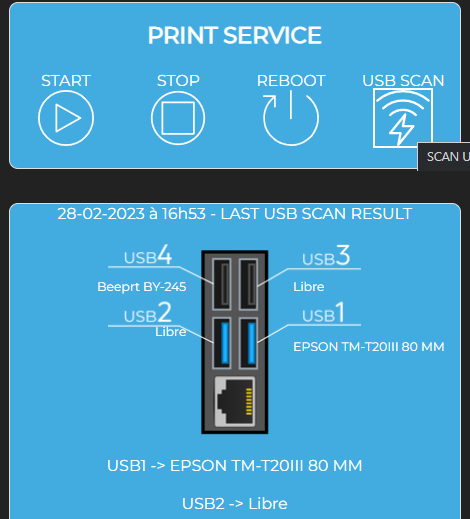
- Your printer is ready to receive remote print orders via our API and website plugins.

Connect the Expedy Cloud Print Box to the WIFI network
Wifi frequencies 2.4Ghz and 5Ghz are supported.
To configure WIFI, Expedy Cloud Print Box must already be connected to the Internet (either via an Ethernet network cable or a 4G key).
Add a WiFi network
- Connect to Expedy console
- Go to MACHINES
- Click on the machine to be configured
- In the WiFi module, click on ADD NEW
- Fill in the fields with your internet identifier (SSID) and password (PWD). If you’ve never changed your internet IDs, they can be found on the label on the back of your internet router, or displayed on the LCD screen.
- Click on SAVE NEW SSID to confirm your identifiers
- Click on UPDATE CONFIGURATION to transfer WiFi settings to the machine
![]() Français (French)
Français (French) ![]() English
English ![]() Español (Spanish)
Español (Spanish) ![]() Deutsch (German)
Deutsch (German) ![]() Italiano (Italian)
Italiano (Italian) ![]() Português (Portuguese (Portugal))
Português (Portuguese (Portugal))