Documentation
-
CMS Plugins
-
API | Developers
-
- Prochainement
-
Printers and Accessories
-
- GPRS connection settings SIM Card 2G 3G 4G
- Image and logo printing
- Internet connection
- Internet connection with a Ethernet cable (LAN RJ45)
- Mention "Printed using Expedy.io".
- Print PDF
- QR Code / Barcode
- QuickStart Cloud Printer 58mm
- QuickStart Installation Cloud Printer 80mm
- Send a test print request
- Tags Settings
- Text layout | Building a receipt ticket
- WiFi Setup
-
- Cloud Print Box: Ethernet cable and WiFi connection
- Connecting an ESC POS ticket printer to the Cloud Print Box adapter
- Image and logo printing
- Installing the Cloud Print USB Adapter
- Mention "Printed using Expedy.io".
- Print PDF
- QR Code / Barcode
- Send a test print request
- Tags Settings
- Text layout | Building a receipt ticket
-
General Terms
-
Expedy TMS
- Prochainement
-
Expedy M2M SIM Card
-
Raspberry Pi
-
Uber Eats printer
-
DoorDash Printer
-
Restaurant delivery platforms
How to install the PrinterSetting software
USB or NETWORK (WiFi/Ethernet) connection (only for Windows)
Compatibility of product models
CLOUD : PP58EWG, PP58EWG-R, PP80EWG, XPDY80EWB, XPDY80EWBG
UBER EATS : PP80UEWBT, XPDY80UWB
POS : PP80USBEBW, XPDY80U, XPDY80USBEBW, XPDYPOS80UEB
Follow these steps:
- Download the PrinterSetting software :
https://www.printer-point.com/docs/printersetting_printerpoint_software.zip - Connect the printer with a USB cable or an Ethernet cable to the same network that your computer.
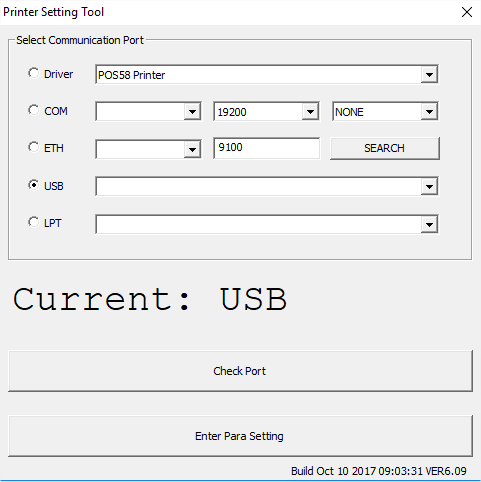
- Select USB or ETH, then click on [Check Port]
- A receipt [Check Port Success] is printed to confirm the connection to the printer.
Every modification is always confirmed by a printed receipt and/or a Beep. - Click on [Enter Para Setting] to configure the settings
Be careful : the software enables you to edit the settings, however the settings you see when you open the software are not those used, there are the “by default” settings.